This is the second post in a series on deploying a video segmentation app for the Arduino Portenta H7 and Vision Shield. You can read the first post for more information on project motivation, as well as the details for setting up our hardware and software development environments.
Overview
The overall project goal is to create a segmentation app, running on the Portenta H7 + Vision Shield, to detect my new kitties Daisy and Peach!
The previous post detailed setting up our Arduino hardware with the OpenMV IDE to access and record the Vision Shield camera feed, like so:
In this post, I will
- Talk more about image/video segmentation tasks – definitions, objectives, and methods.
- Use that setup to record some video of the cats and their surroundings in my apartment.
- Load clips extracted from my recorded video into MiVOS to generate training data for a segmentation neural network.
By the end of this post, we will be ready to start training a segmentation neural network on our Vision Shield camera’s video data. In the next post, we will run through the details of training a segmentation neural network on consumer desktop NVIDIA GPU hardware, leading to a final post where the large desktop segmentation model is transferred to a final embedded model capable of running on the Arduino.
Image & Video Segmentation
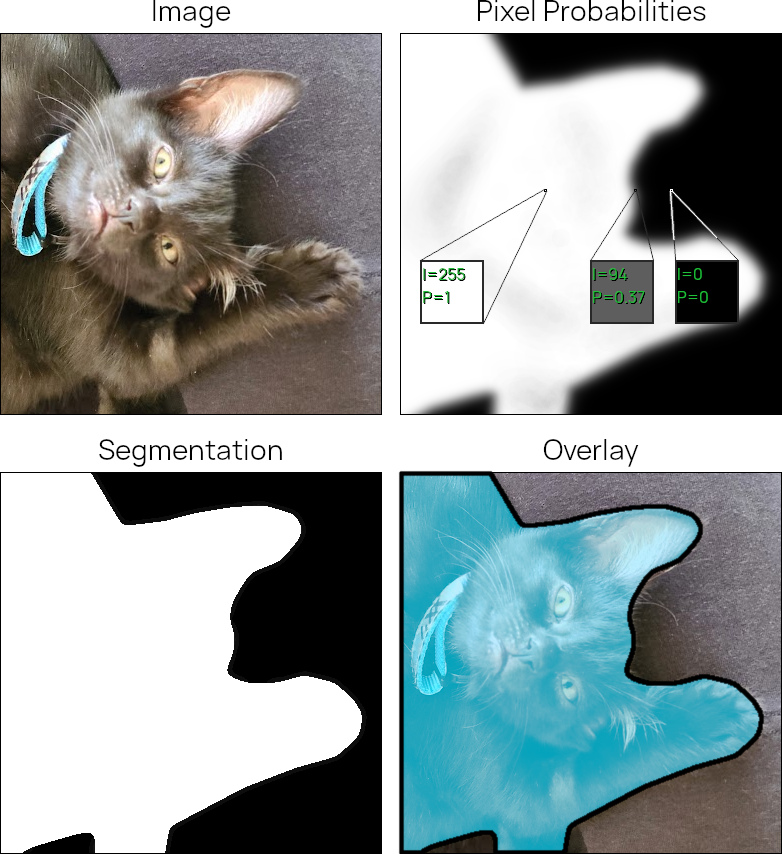
The fundamental task this project is concerned with is semantic segmentation – the classification of pixels in an image into one or more categories. For this project we will have a single category: “cat”. For each of the 76,800 pixels in our 320x240 camera frames, our segmentation algorithm will predict a probability that the pixel belongs to a cat in the scene. This next image illustrates the idea of per-pixel probabilities, and how those probability values (from 0 to 1) can get mapped to image intensities (from 0 to 255).
For a more complete introduction to problems in computer vision in general, check out this blog post put out by SuperAnnotate, a data labeling company. For an introduction to semantic segmentation and the similarities and differences with instance segmentation, check out this blog post by the same people.
Data labeling
What is the practical upshot of all this background material? Creating a successful computer vision algorithm via supervised learning requires a good model and great labeled data, with the highest accuracy possible and the more volume the better. For image segmentation this can be challenging, as manually creating accurate object masks (like I did for the previous figure) using a tool like Photoshop or GIMP is time-consuming. For video segmentation, this challenge is greatly magnified by the need to update masks as objects move and change within a field of view.
Recording Video
Neural networks are brittle. For computer vision tasks, inputs that are very different from the data a neural network was trained on may drop performance to a greater degree than a human would intuit. Tautologically, our visual systems get exposed to all the different sorts of environments that humans care about, while our machine learning algorithm will only get trained on a comparatively-tiny set of video data. Success therefore depends on aligning our distribution of training data with project goals.
To keep it concrete: I want a cat segmenter. I want a cat segmenter, running on a Vision Shield, that I can use attached to a little robot mouse as it scurries around my apartment. This means I want to collect data from all the different locations and conditions that such a device is likely to experience in my apartment. I need to record:
- Diverse footage of the cats, at different distances and angles and locations throughout the house. But also diverse footage without cats, if I want to keep my false positive rate low.
- On my hardware. Compared to modern webcams and phone cameras, the Vision Shield camera’s 384x384 grayscale sensor is very simple. A neural network trained on consumer digital video may fail to properly transfer to the Vision Shield camera. There are likely some tricks one could use to leverage existing datasets, but capturing data from the actual hardware we’re going to use is important.
- From close to ground level, from a perspective similar to that of the Arduino car I might eventually mount the camera on. Matching the exact height and orientation shouldn’t matter, and in fact getting a bit of variety will probably help robustness. For the sake of getting off the ground, I recorded my footage just holding the Arduino attached to a laptop running OpenMV.
- Under many lighting conditions. Lighting has a huge role in introducing visual variability into natural environments, and simpler cameras like the Vision Shield’s don’t handle high dynamic ranges as well as consumer digital cameras. Including that variability (and its impact on the camera sensor) in the training data is the simplest way to start dealing with it.
To record video with OpenMV, I followed the final steps described in the previous post, running helloworld_1.py and using OpenMV’s built-in Record feature to save MP4s as I moved about the apartment with my camera and laptop. I did this 5 times to get 5 source videos for making clips.
Given the 5 recorded videos, I created clips of ~10s length using an ffmpeg one-liner. From a terminal open in the same directory where I saved a given video, I ran:
mkdir clips && ffmpeg -i <video name> -c copy -map 0 -segment_time 00:00:10 -f segment -reset_timestamps 1 clips/%03d.mp4
This creates a clips/ subdirectory with the desired clips.
We’ll select a subset of the clips to start labeling with MiVOS.
Video Labeling
The goal of our data labeling is to create annotations like this:
Manually tracing Daisy’s outline in each of 385 frames would be infeasible, but tools exist to help with this task, sometimes called video object segmentation in the literature. I have chosen MiVOS because of its accessible UI and decent performance.
